Followers

Showing posts with label Tutorial. Show all posts

Dec 4, 2013

Tutorial : Purple Haze Make up

It’s been awhile since I made any tutorial or updated my blog. Finally, I have something to put up. I made this video middle of November but I couldn’t find any guts to really post it. I have done a make-up tutorial before as a contest entry but this one is a video tutorial. Since my camera broke down a few months ago, I recorded the video using my webcam. I hope you would still enjoy watching although it’s not on HD.

Anyway, the inspiration of this look is Purple Haze which I think is a kind of plant. I like the color combination of pink and purple and I wanted to see if it would look good on me. Well, it does look good even with a hooded lid like mine. It’ll be nice for evening parties specially this holiday season.

Enjoy Watching...

Apr 6, 2013

Nail Art Tutorial : Cherry Nails


I saw this from an old nail magazine and thought it would be really cute for the season. The colors are refreshing to look at too. It is a little bit girly because it's all in different shades of pink and the only green color are the leaves but it's never out of season. It's also really easy since these are just cherries. There's also no need for any special tools.

My base nail color is regular baby pink except for the ring finger. I had the same nail polish I used for the cherries on my ring finger with a little bit of fine red glitter polish for sparkle. On my thumb, I put together two round gems with tear drop shape gems for the leaves. For the rest of my nails, I simply blobbed the nail polish with my brush and added a bit of glitter too. You don't have to be too neat on this one. They don't have to be perfect circles or anything and no placement pattern is needed. Feel free to place the blob wherever you like it to be. Finish it off with a stroke a green polish for the the leaves and clear top coat.

Mar 24, 2013

Nail Art Tutorial : Rainy Day Inspired Nails


This nail art is inspired by the rainy season. I live in a tropical country so it's either hot or rainy. It's only the end of March and it's suppose to be hot but last Friday was surprisingly rainy. As I mentioned on my previous post, I was also having some problem with my internet connection so I had some time to do other things beside browsing the web. This one is really simple so I didn't bother making a video. I hope you could still follow through .

Mar 21, 2013

Tutorial : Ombre Gem Necklace

I've been practicing some basic wire wrapping recently and this is, by far, the easiest I did. I didn't take any measurements though. You can see on the picture how simple it is. I simply pick some random gems with dark to light colors and wrap the wire around it. I chose the three biggest and smoothest in my stash. It'll be too difficult if the stones are crooked. It's a good design additional if the shape of the stone is irregular but it's another thing to manage wrapping it with wire properly. I know it's not like I'm doing anything difficult but you must master the basics first before advancing to the next level.

For the chain size, I think with the length of the pendant, it's better to take a shorter chain like the size for a choker and wear it with your casual collarless tee. Or a longer one if you want to wear with something with collar.

About being gone last Sunday, internet connection was really bad. It's been going on and off for two weeks now and my provider cannot really give a definite schedule when the connection will be fixed. So to my lovely followers, please hang in there. I'll be posting as promised after my connection issues are fixed.

Mar 5, 2013

Nail Art Tutorial : Gothic Lolita Nails


It's been ages since I did any nail art tutorial. Since I have so much time right now, I'm hoping I could do more of these. This is quite simple so I decided to make it a written tutorial only. I used a combination of regular lavender nail polish from Etude House in PP903 and and on top of that is shimmery lavender PP905. I combined it because the shimmer one would be too light if I were to use it on its own. The dark silver nail polish is from Barry M. Magnetic Nail Paints.

Feb 26, 2013

Tutorial : Multicolor Necklace


I saw this necklace on Instagram a few days back (click here). It's really simple but I think it'll be good for everyday outfits. When I check the website, gemleys.com, it cost £13 or roughly Php800 plus shipping. It may be worth its cost since its made of sterling silver and combination of precious gems but I just won't spend that much on a fashion jewelry so I decided to make my own.

Jul 14, 2012

Nail Art Tutorial : Lovin' Ice Cream

My second summer nails! I don't know if it looks like it but it's a light cranberry ice cream with syrup and chocolate sprinkles. Since it rains a lot in the Philippines now, I chose a shimmery type of really light pink, a regular brown polish to be the syrup and a few micro beads for sprinkles. I got the idea from a previous edition of Nail Up, a Japanese Nail Art Magazine, from Eki's blog. If you like to read about cute finds and see Japanese Magazine Scans you should visit her site. She also make good reviews. Click here to visit her site.

Jun 22, 2012

Nail Art Tutorial : Summer Sprinkles


Here's my latest nail art video. Sorry it took me awhile to publish a new one. I hope you'll like my easy to do summer inspired nail art. 

Mar 19, 2012

Nail Art Tutorial : Flower Bed

Another simple nail art tutorial for everyone to try. You will only need two accessories to follow this nail art tutorial. Simply click on the link provided below to redirect to those post. Hope you like this one.

Instructions:
1. Choose your base coat. I'm using OMG nail polish in Jet black. Darker base emphasizes the nail sequence.

2. Swipe some glue on the part of your nails nearest to the cuticle.

Feb 12, 2012

Nail Art Tutorial : Berries for V-day


Happy hearts day everyone! Here's my V-day Nail Art Tutorial for you ladies. I hope you like it. It's nothing hot or sophisticated. If I'll describe it, it's more like flirty and playful. It's a little difficult compare to the first that I made because the tips but it's worth the patience.

Instructions :

  1. Swipe Caress nail polish in Platinum to be the base color of your nails.
  2. With Sassy Nail Art in black, make a triangle tip then fill it up with the same polish.
  3. Taking the red Sassy Nail Art, create another triangle on top of the black.
  4. With the same red nail polish, draw a line under the black.
  5. Add some gray Klick Nail Sequence beneath the red line.
  6. Place a purple gem on one end of your nails then add a green tear drop shape gem to serve as a leaf.
  7. Finish it off with a final coat of Caronia Colorless.

Feb 4, 2012

Tutorial : Spring Drops Bracelet

The bracelet is inspired by the pastel colors of spring, hence the name, with a little darker hue for contrast. I used a combination of glass beads and tinted pearls for this project. I also chose copper instead of 10k gold because copper hoop rings are a lot stronger. If you still prefer to use gold, I suggest you use gold filled hoop rings.

Jan 28, 2012

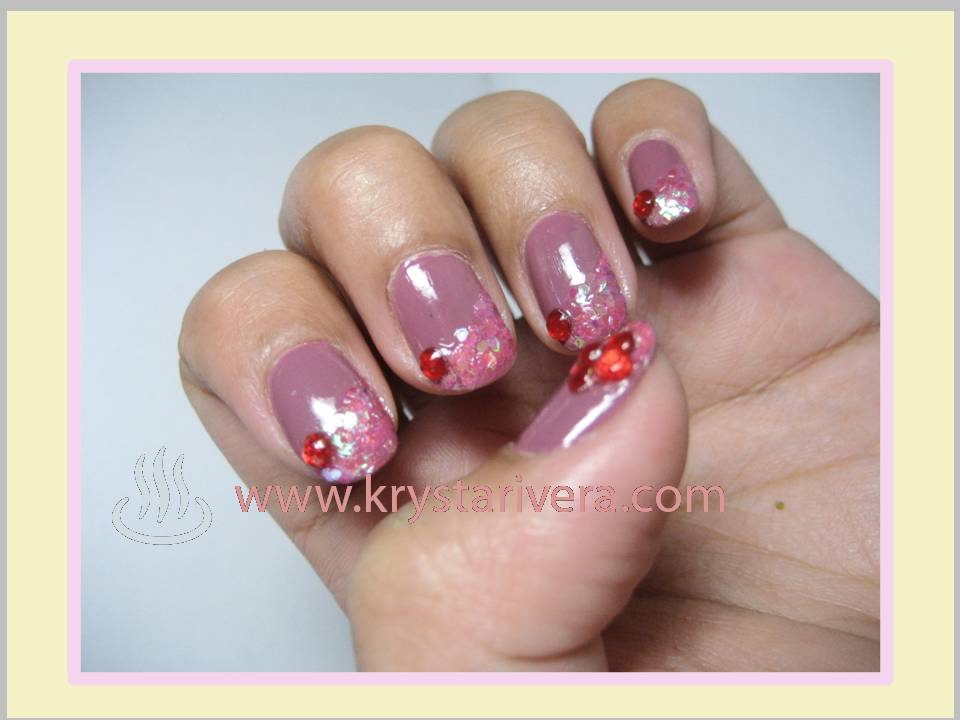
Nail Art Tutorial : Floral Nail Blush


This will be my first nail art tutorial ever. The design is really simple and all products mentioned are linked to the related review/haul posts. Please let me know if you like it by posting a comment below.

Instructions :

  • Color your nails with Caronia in Italian Nude. This will serve as the base color of your nails.
  • Put glue or clear nail polish at the tip of your nails on a diagonal direction.
  • Dip your nails on the pink Nail Sequence ( Nail Art Accessories Haul ) then  flatten them. Brush off the excess but make sure to maintain the diagonal tip.
  • Put a red nail gem on the higher end.
  • Lastly, seal the design with clear nail polish.

Jan 14, 2012

Tutorial : Vintage Pearl Bracelet

It's been awhile since I did an accessory video so to start the year, here's a new accessory tutorial. This is easier than the others I made so I decided to use power point to emphasize little details.

Mar 9, 2011

Tutorial : Floral Inspired Bobby Pin


I got the idea from a Japanese beading magazine I was reading. It was intended to be a pendant of a full length necklace so I made a few adjustments to make sure it'll fit a bobby pin.

The same may also be used as a design piece for a bracelet or hairband.

Mar 5, 2011

Tutorial : Beaded Hair Cuff (Wire Wrap)

Finally, my hair twisting paid-off. I made hair cuffs with it. You can use the same technique in making earrings and bangles... :). 

For hair cuffs, the bigger your beads are, the better particularly if you have thick hair like mine. But for the demo, I used rice pearls. 

Related Posts Plugin for WordPress, Blogger...